Dev Tools > Pipeline > Console User Guide > Template Guide
This document explains how to create a pipeline using a template file.
Create a pipeline identical to an existing pipeline
Download a JSON file from an existing pipeline to create a new pipeline of the same type.
1. Download existing pipeline JSON file
You can download the JSON file by selecting an existing pipeline and going to View JSON in Basic Information > Download Pipeline Template.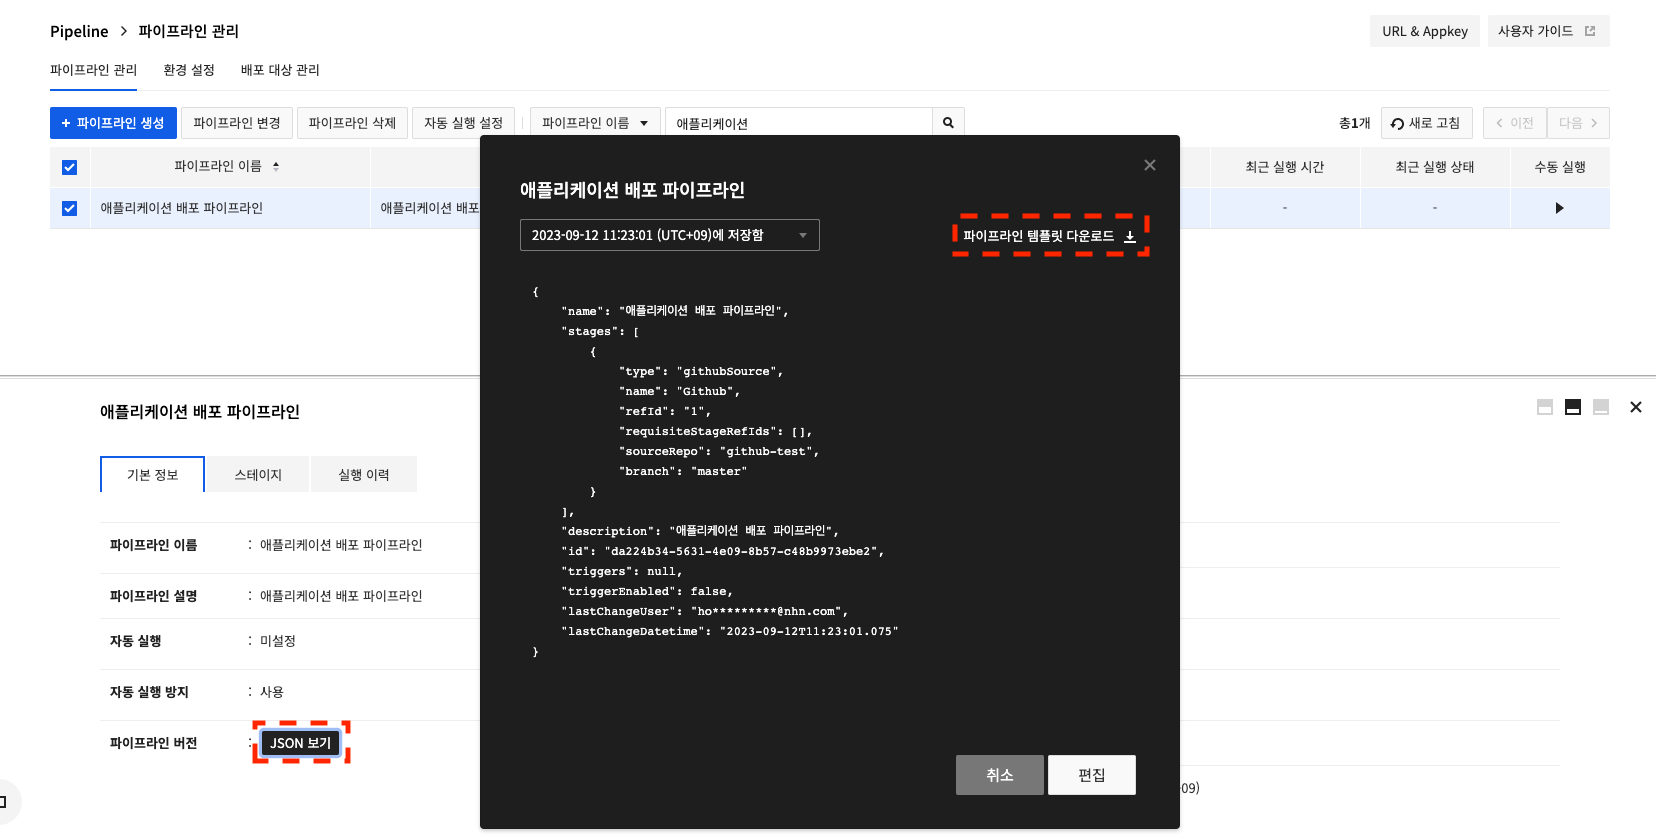 template-guide-01
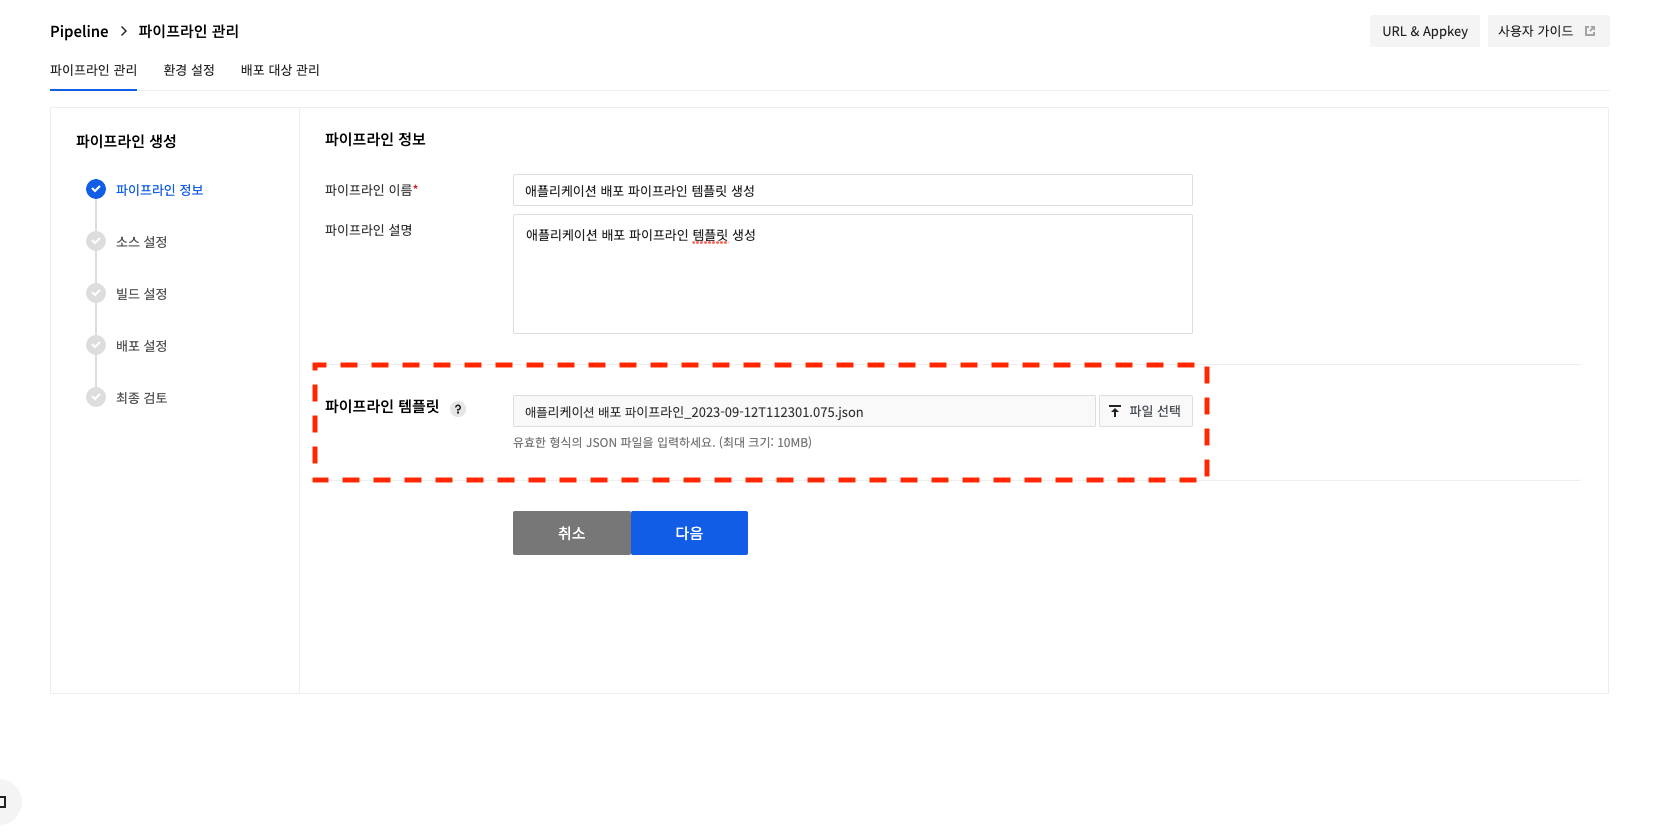
2. Create a pipeline with a template file
2.1 In Pipeline Management, click Create Pipeline. Upload the downloaded JSON file. If you click Next after uploading, you will immediately proceed to the Final Review step.
 template-guide-02
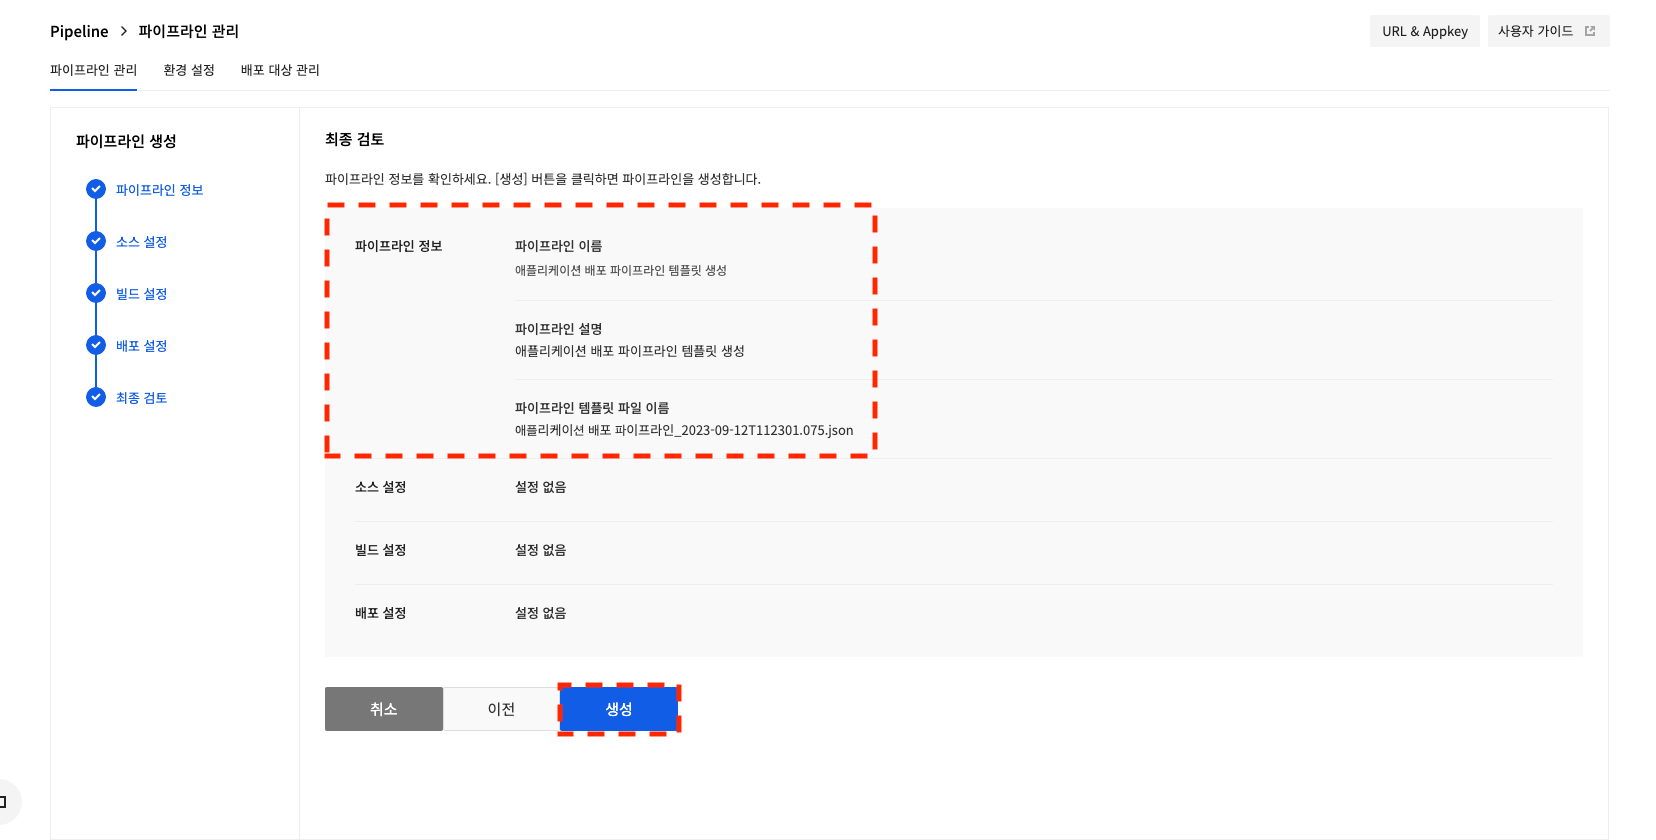
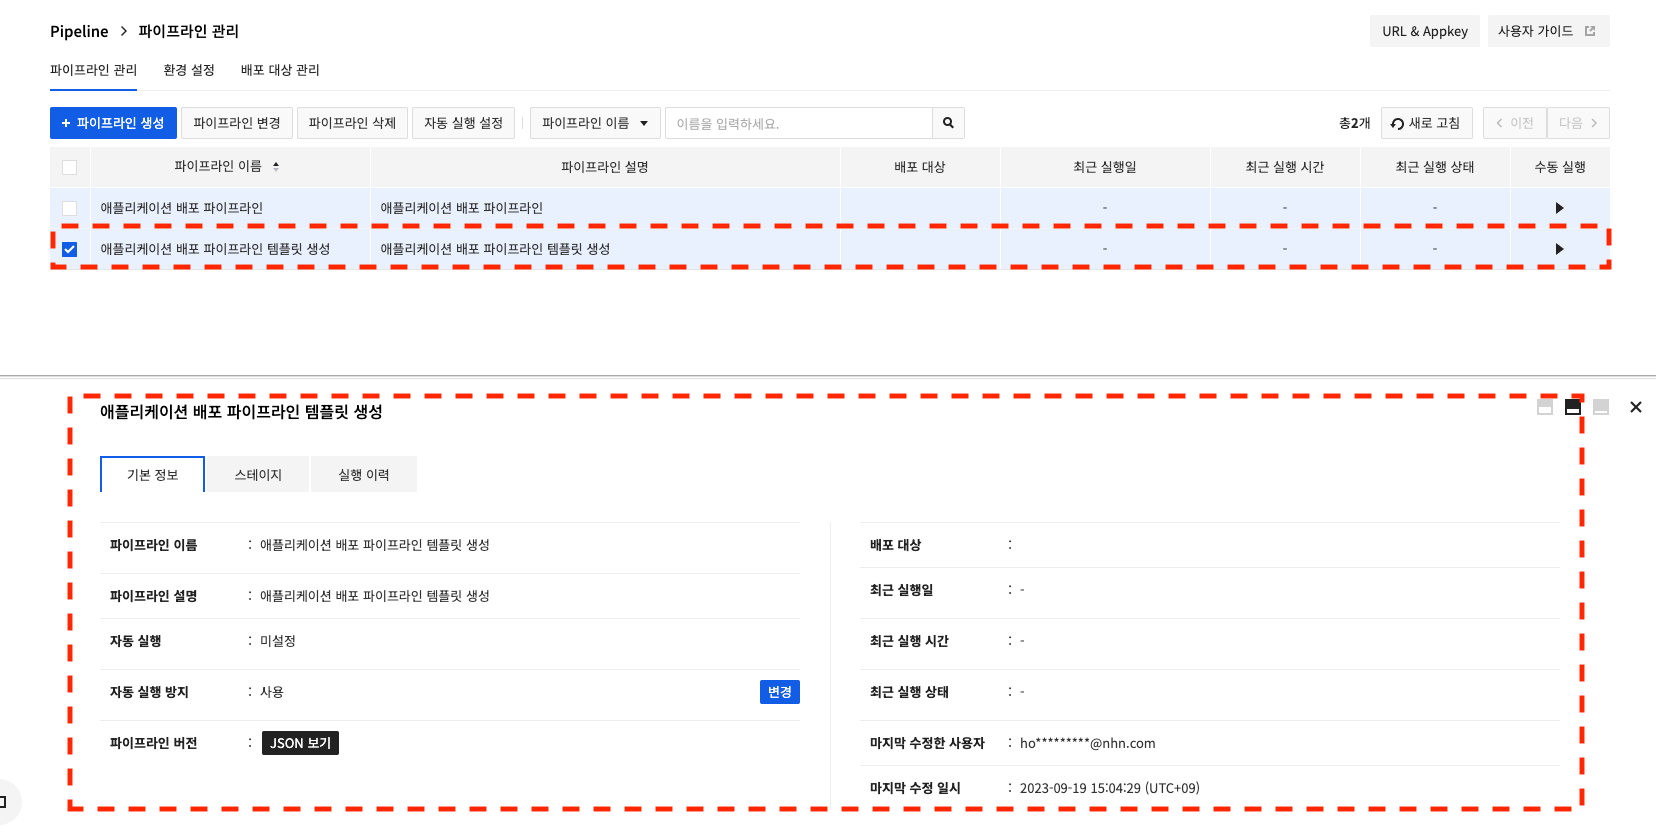
2.2 At the Final Review stage, you can check the registered file name and click Create to create the pipeline.
 template-guide-03
 template-guide-04
Create a pipeline with a sample scenario template
Use sample template files for each scenario to create pipelines easily.
You can use it by downloading the JSON file for the scenario you want, and then entering the entirety of the data it requires in curly braces ({}). Note that the data must be registered, especially for data prefixed with [env configuration], as it uses data from Pipeline > env configuration. You can find instructions on how to register in the Pipeline user guide.
Sample scenario templates for using Bake Stage will be available at a later date due to feature changes.
1. Basic scenario for the source - build - deploy
This is a scenario where you get the source code from Github, build it with the NHN Cloud build tool, and deploy it as manifest information to the target server.

After downloading the registered JSON file, you'll need to enter information about the data indicated by curly braces.
Source Stage
The guide is based on Github during the source stage. A detailed guide to the stages can be found in the Pipeline stage guide.
{
"type": "githubSource",
"name": "source",
"refId": "1",
"requisiteStageRefIds": [],
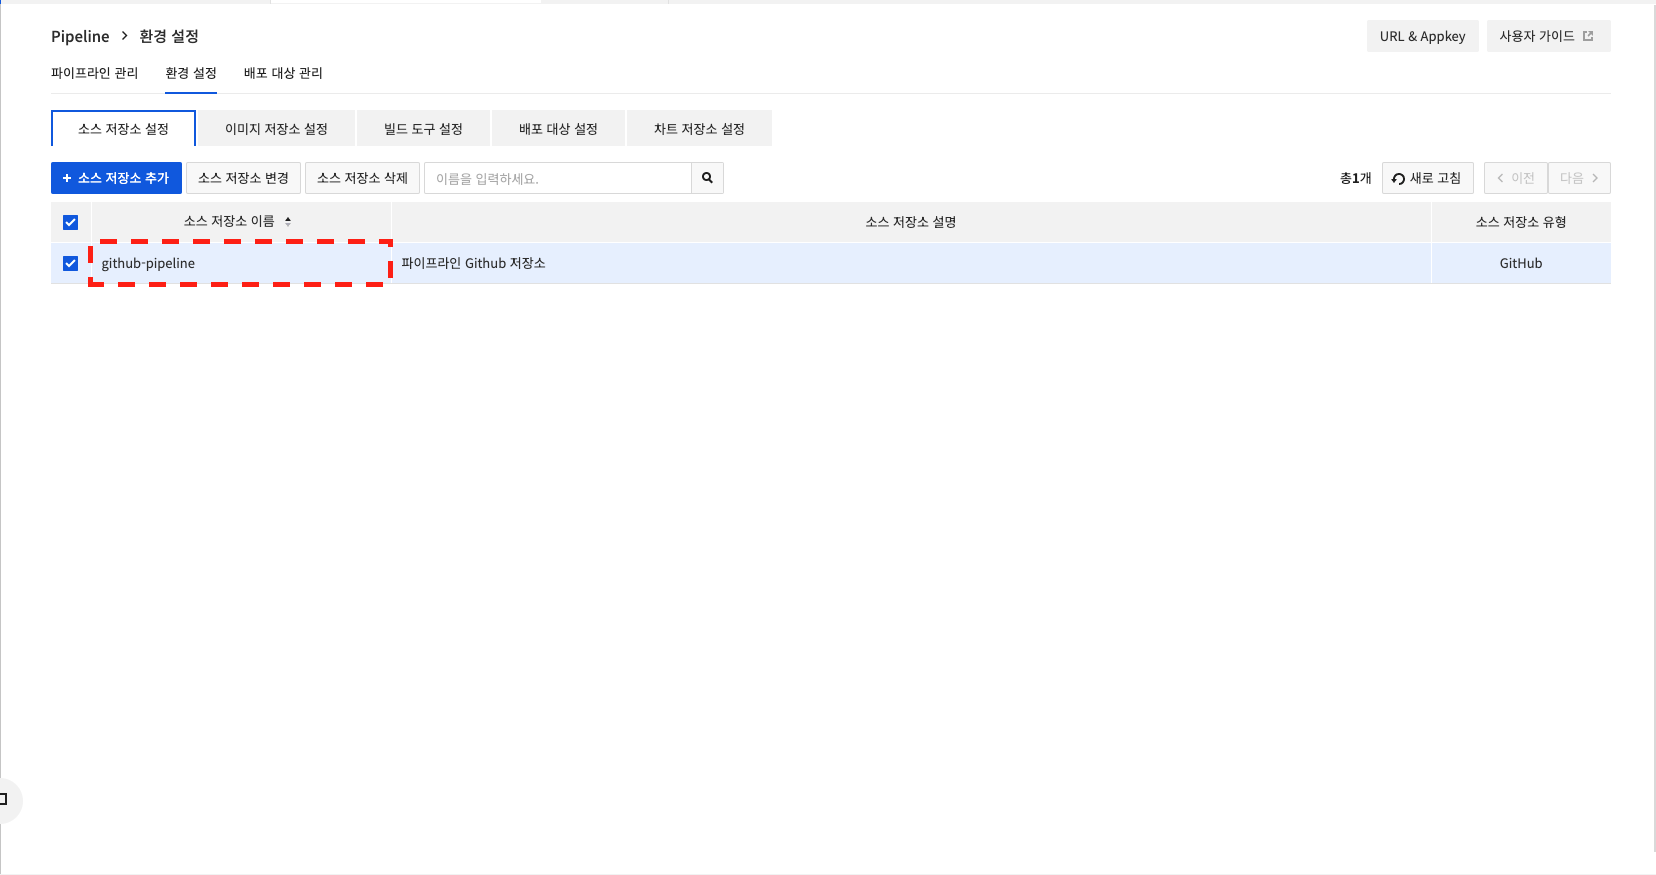
"sourceRepo": "{Source repository name stored in [preferences] source repository settings}", //requires source repository name registered in env configuration.
"branch": "{Deployment target branch}" //Requires input of a value corresponding to the source branch to be deployed (e.g., main).
}
"sourceRepo": "{Source repository name stored in the source repository settings}", check the source repository name to use among the information registered in the source repository settings in the env configuration, and modify it like "sourceRepo": "github-pipeline".
The image storage settings and deployment target settings alsoneed to be modified after name resolution.
Build Stage
The guide is based on the NHN Cloud build tool during the build stage. You can find detailed guides for the stages in the Pipeline Stage Guide.
{
    "type": "imageBuild",
    "name": "build",
    "refId": "2",
    "requisiteStageRefIds": [
        "1"
    ],
    "buildImageRegistry": "{image repository name stored in [env configuration] image repository settings}", //requires an image repository name registered in the env configuration (e.g. buildImageRegistry-pipeline).
    "buildImageName": "{image name}", //Image name input is required (e.g. maven).
    "buildImageTag": "{image tag}", //Image tag information is required (e.g. 1.0.0).
    "buildCommand": "{buildCommand}", //A build command is required (e.g. mvn package).
    "dockerfilePath": "{Dockerfile path}", //Dockerfile path input is required (e.g. Dockerfile).
    "buildWorkDir": "", //Optionally, enter the executable path of the Dockerfile.
    "pushImageRegistry": "{[Preferences] Name of the image repository stored in the image repository settings where the build results will be uploaded}", //You need to enter the name of the image repository registered in the env configuration (e.g. pushImageRegistry-pipeline).
    "pushImageName": "{build result image name}", //Requires an image name for the build result (e.g. result-image).
    "pushImageTag": "{build-result-image-tag}", // Requires a tag for the build result image (e.g. latest).
    "buildFlavorName": "c2m4", //Default is c2m4, also available for c4m8 performance.
    "buildTimeout": 30, //Default is 30 minutes. Can be entered from 1 to 600.
    "startArtifacts": null,
    "expectedArtifacts": null
},
Deploy Stage
The Deploy stage is guided by the Deploy stage. You can find a detailed guide to the stages in the Pipeline stage guide.
{
    "type": "deployManifest",
    "name": "deploy",
    "refId": "3",
    "requisiteStageRefIds": [
        "2"
    ],
    "deployTarget": "{[env configuration] Deployment target name stored in your deployment target settings}", //requires a deployment target name registered in the env configuration(e.g. deploy-pipeline).
    "manifests": [
        // Deployment manifest information is required.
        // Refer to the example below to create, register, and use it.
        {
            "apiVersion": "apps/v1",
            "kind": "Deployment",
            "metadata": {
                "labels": {
                    "app": "pipeline-test"
                },
                "name": "pipeline-test"
            },
            "spec": {
                "replicas": 2,
                "revisionHistoryLimit": 3,
                "selector": {
                    "matchLabels": {
                        "app": "pipeline-test-example"
                    }
                },
                "template": {
                    "metadata": {
                        "labels": {
                            "app": "pipeline-test-example"
                        },
                        "name": "pipeline-test-example"
                    },
                    "spec": {
                        "containers": [
                            {
                                "image": "example.registry.container.nhncloud.com/test/pipelineImage:latest",
                                "imagePullPolicy": "Always",
                                "name": "pipeline-test",
                                "ports": [
                                    {
                                        "containerPort": 8080
                                    }
                                ]
                            }
                        ]
                    }
                }
            }
        }
    ],
    "namespaceOverride": "",
    "startArtifacts": null,
    "expectedArtifacts": null,
    "manifestArtifactId": null,
    "manifestSource": "text",
    "manifestArtifact": null
}
The manifest information used by the Deploy stage needs to be changed to fit your deployment environment. The YAML file needs to be changed to JSON format (It is recommended to work in the console UI with stage changes).
The following scenarios are also based on that scenario.
2. Scenario for adding pipeline completion notification
This is a scenario to receive notifications via webhook after deployment. Enter the data corresponding to the URL, Payload, and Method to receive the webhook.

You can find a detailed guide to the Webhook stage in the Pipeline stage guide.
{
    "type": "webhook",
    "name": "webhook",
    "refId": "4",
    "requisiteStageRefIds": [
        "3"
    ],
    "url": "{Webhook send URL}",
    "payload": null, // http request body
    "customHeaders": {}, // http request header
    "failFastStatusCodes": [
        500  // 403,500,503
    ],
    "method": "{}" // GET, POST, PUT, DELETE, PATCH, HEAD
}
3. Scenario for auto-running a pipeline when a Github (GitLab, image repository) event occurs
You can set up Github (GitLab, image repository) autoruns by setting up the Trigger area of the template.
There is additional guidance on inputs in the Autorun section of thePipeline console user guide.
"triggers": [
    {
        "type": "git",
        "branch": "{Branch}",
        "organization": "{Organization name or username}",
        "secret": "{Secret information}",
        "project": "{Project name}",
        "source": "github"
    }
],
4. Scenario for deploying separate development and live environments with one pipeline
One pipeline can be deployed to branch out based on your preferences.
This scenario can be utilized when deploying to separate environments, such as development and real.
 As shown in the pipeline written in the example, you can select
 develop, realto deploy to the environment of your choice.
You can change it to any other value, and the value of the Precondition Stage behind it will need to be modified equally.
You can find detailed guides for the Judgment and Precondition stages in the Pipeline stage guides.
[
  {
    "type": "manualJudgment",
    "name": "judgement",
    "refId": "4",
    "requisiteStageRefIds": [
      "2"
    ],
    "failPipeline": false,
    "completeOtherBranchesThenFail": false,
    "continuePipeline": false,
    "instructions": "Development environment, real environment branch processing",
    "judgmentInputs": [
      {
        "value": "develop" // Must be the same value as the preconditions.
      },
      {
        "value": "real" // Must be the same value as preconditions.
      }
    ],
    "notifications": []
  },
  {
    "type": "checkPreconditions",
    "name": "precondition-develop",
    "refId": "5",
    "requisiteStageRefIds": [
      "4"
    ],
    "preconditions": [
      {
        "failPipeline": false,
        "type": "expression",
        "context": {
          "equals": true,
          "targetExecutionValue": "develop", // Can be changed to any value you want.
          "expression": null,
          "failureMessage": null
        }
      }
    ]
  },
  {
    "type": "checkPreconditions",
    "name": "precondition-real",
    "refId": "6",
    "requisiteStageRefIds": [
      "4"
    ],
    "preconditions": [
      {
        "failPipeline": false,
        "type": "expression",
        "context": {
          "equals": true,
          "targetExecutionValue": "real", // Can be changed to any value you want.
          "expression": null,
          "failureMessage": null
        }
      }
    ]
  },
]
5. Scenario for adding a pre-deployment approval process to your real environment.
Download Template Files
 In scenario #4, you can add an approval stage before deploying to a real environment, configuring it to be deployed after approval.
You can find a detailed guide to the approval management stage in the Pipeline stage guide.
{
    "type": "manualJudgment",
    "name": "approve",
    "refId": "8",
    "requisiteStageRefIds": [
        "6"
    ],
    "instructions": "This is the approval management stage.",
    "judgmentInputs": [],
    "approval": true
}
6. Scenario where multiple pipelines are deployed to separate development and real environments.
When pipelines are organized separately by environment, the pipeline itself can be selected and deployed.

[
  {
    "type": "pipeline",
    "name": "execute-pipeline",
    "refId": "4",
    "requisiteStageRefIds": [
      "2"
    ],
    "pipeline": "{Pipeline ID you want to run}",
    "waitForCompletion": true
  },
  {
    "type": "pipeline",
    "name": "execute-pipeline",
    "refId": "5",
    "requisiteStageRefIds": [
      "3"
    ],
    "pipeline": "{Pipeline ID you want to run}",
    "waitForCompletion": true
  }
]
The pipeline ID can be found by clicking Pipeline Version > View JSON.
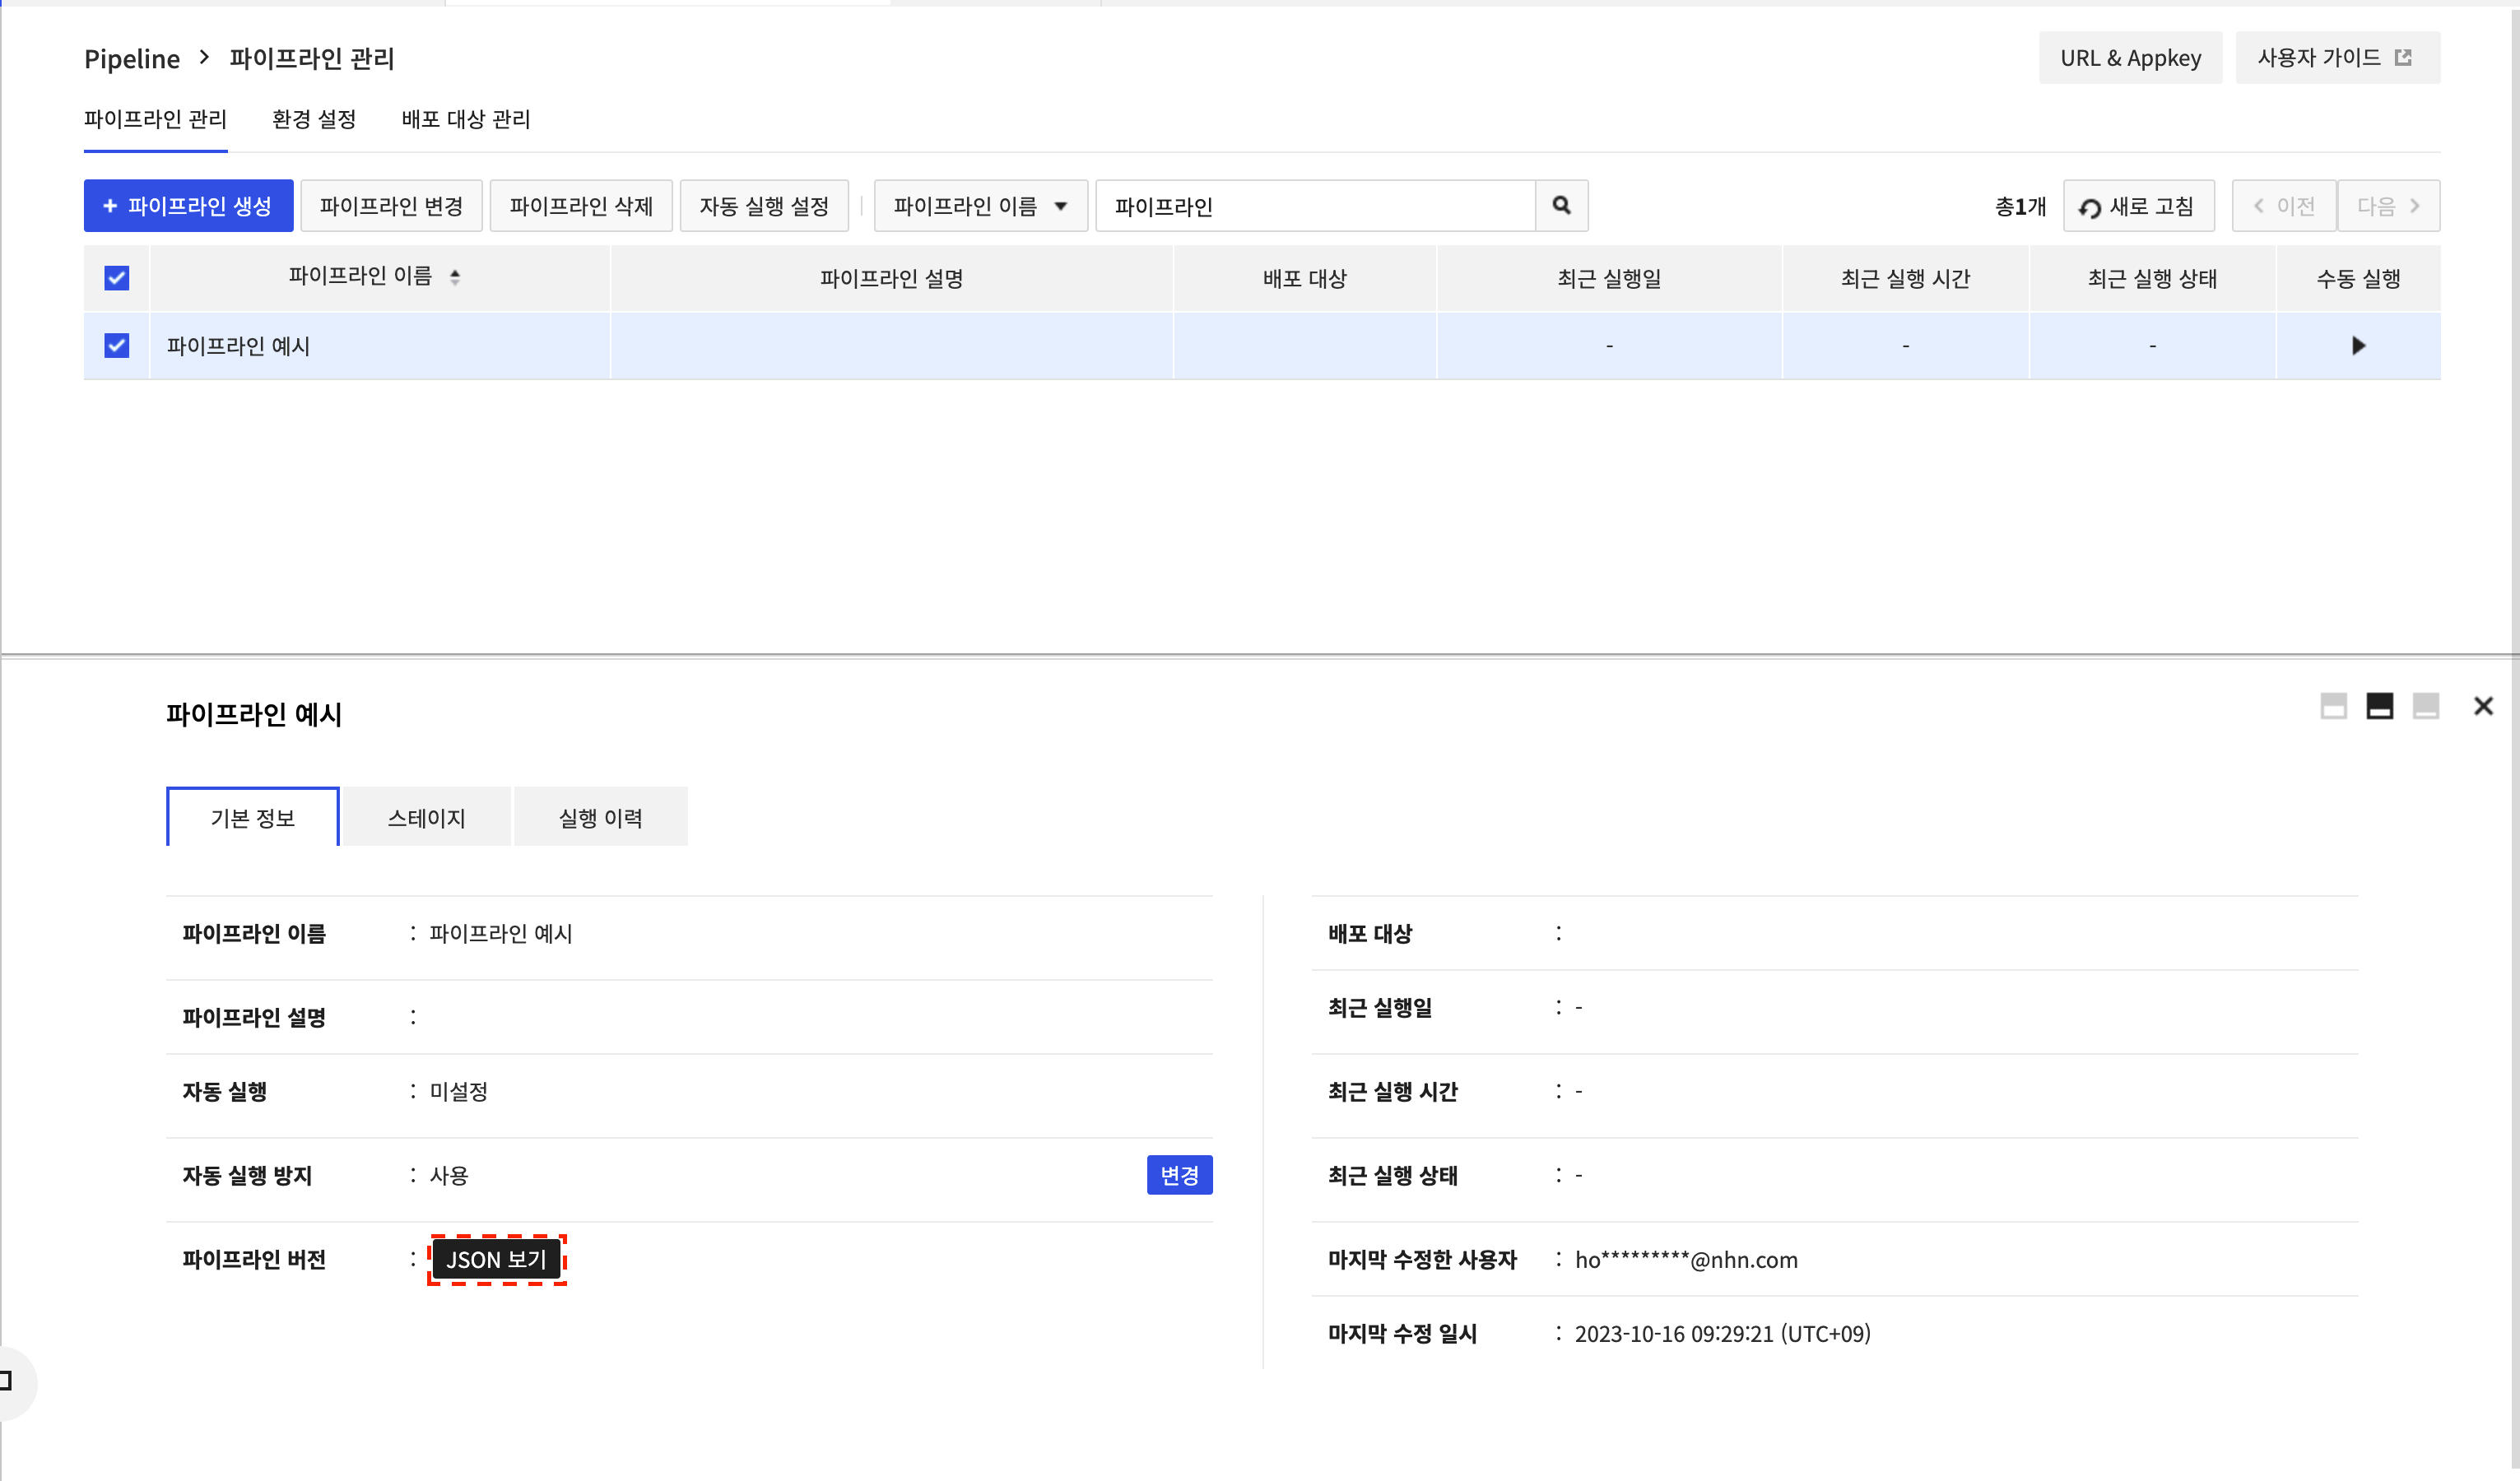
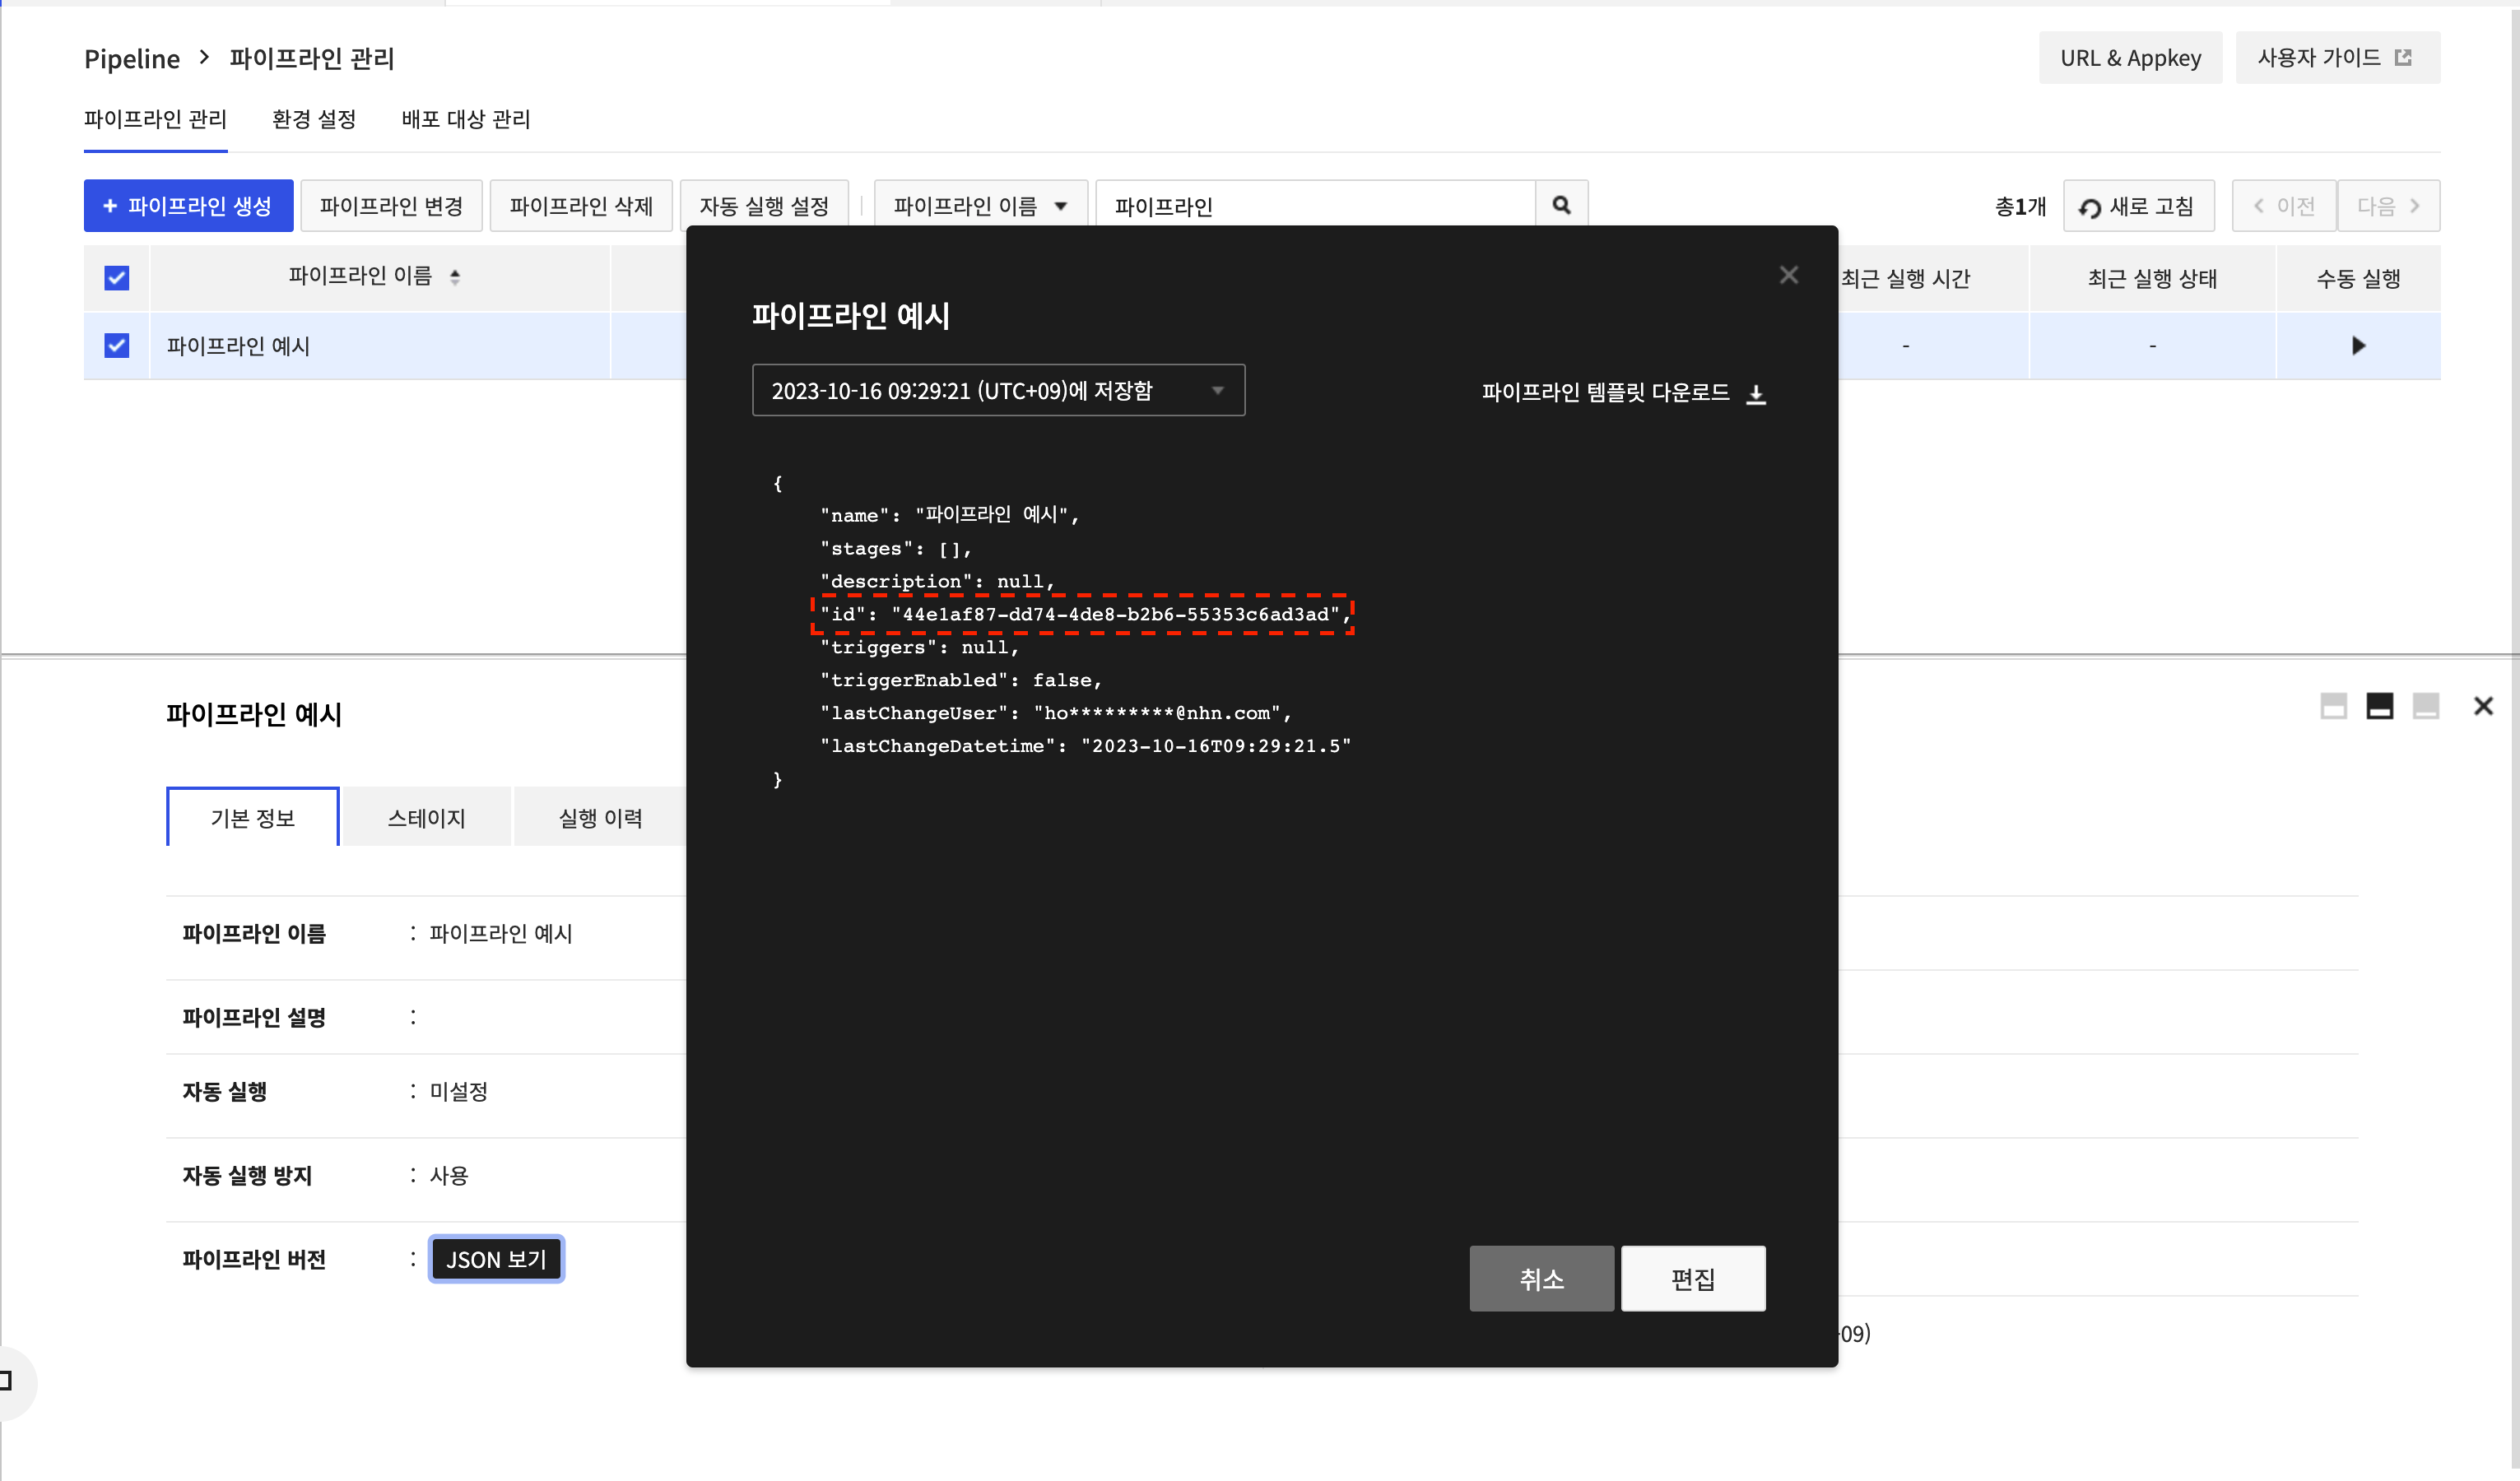
Table of Contents
- Dev Tools > Pipeline > Console User Guide > Template Guide
- Create a pipeline identical to an existing pipeline
- 1. Download existing pipeline JSON file
- 2. Create a pipeline with a template file
- Create a pipeline with a sample scenario template
- 1. Basic scenario for the source - build - deploy
- 2. Scenario for adding pipeline completion notification
- 3. Scenario for auto-running a pipeline when a Github (GitLab, image repository) event occurs
- 4. Scenario for deploying separate development and live environments with one pipeline
- 5. Scenario for adding a pre-deployment approval process to your real environment.
- 6. Scenario where multiple pipelines are deployed to separate development and real environments.